«
  • How to Set Up a Projector (Mac Version)

    This guide contains instructions for setting up a projector with a Mac computer such as a MacBook.

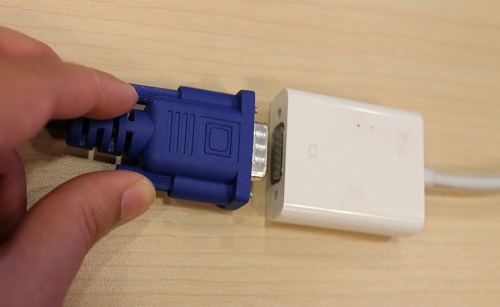
    You will need a video adapter suited for your model of computer and a video cable (usually included with the projector). See LAS IT ahead of time if you need to make a reservation.

    You can find a printable version of this guide here.

  • Step 1: Connect the projector to a power source.

    Step 1

    Connect the projector to a power source.

  • Step 2: Turn on the projector. The power LED will blink.

    Step 2

    Turn on the projector. The power LED will blink.

  • Step 3: Ensure the projector projects an image, such as a blue screen or an input name. If it does not, check the power light and power cables. Redo the setup if necessary.

    Step 3

    Ensure the projector projects an image, such as a blue screen or an input name.

    If it does not, check the power light and power cables. Redo the setup if necessary.

  • Step 4: Connect the video cable to the projector, making a note of which port it is connected to. (In this example, the port is named 'COMPUTER 1 IN')

    Step 4

    Connect the video cable to the projector, making a note of which port it is connected to. (In this example, the port is named "COMPUTER 1 IN")

  • Step 5: Connect the video adapter to the computer.

    Step 5

    Connect the video adapter to the computer.

  • Step 6: Connect the other end of the video cable to the adapter. The Mac should connect to the projector automatically. If it does not, proceed to Step 7.

    Step 6

    Connect the other end of the video cable to the adapter.

    The Mac should connect to the projector automatically. If it does not, proceed to Step 7.

  • Step 7: Locate the button on the projector that controls the projector's input, labeled 'Source' or 'Input.' Toggle through inputs until you reach the port named in Step 4. If the Mac still doesn't project, proceed to Steps 8-10.

    Step 7

    Locate the button on the projector that controls the projector's input, labeled "Source" or "Input." Toggle through inputs until you reach the port named in Step 4.

    If the Mac still doesn't project, proceed to Steps 8-10.

  • Step 8: On the Mac, open the Apple menu and select 'System Preferences.'

    Step 8

    On the Mac, open the Apple menu and select "System Preferences."

  • Step 9: Select 'Displays.'

    Step 9

    Select "Displays."

  • Step 10: elect the 'Display' tab, and then click 'Detect Displays.' If 'Detect Displays' is not available, press the Option key.

    Step 10

    Select the "Display" tab, and then click "Detect Displays." If "Detect Displays" is not available, press the Option key.

»